In an increasingly digital and security-conscious world, ensuring the authenticity and integrity of your business documents is more important than ever. Whether it’s invoices, sales orders, or official statements, digitally signing PDF documents and reports has become critical for many organisations.
With bConnect, Accelon offers a seamless and secure way to generate, sign PDF documents, invoices, reports, and distribute them while maintaining complete control and automation.
In this blog, we’ll take you through the process of signing and sending digital invoices and PDF documents through bConnect. Let’s dive right in.
The Digital Signature File and Its Installation
To get started, the user must first possess a digital signature file. If it is already created, then we can move on to the next step, but if not, we can guide you to get one. Users who need or want to create a new one can create it using trusted providers such as eMudhra.
Usually, creating a digital signature involves a verified identity process. Users can first register at the platform for a digital signature certificate. Then, they are asked to provide business information and identity documents and often go through Know Your Customer (KYC) verification processes.
Once verified, eMudhra issues a digital signature certificate, and users receive a PFX (.pfx) file along with the secure password for it. The digital signature file can be stored in a desired location for further use.
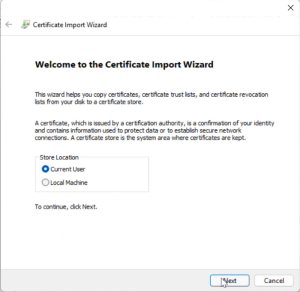
Copy the digital signature file in the folder where bConnect is installed. To import it into bConnect for further use, users need to double click on the file, which opens the Certificate Import Wizard window and select the Store Location from the two given options and click on the Next button
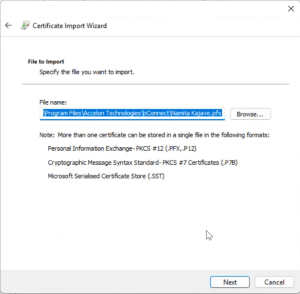
This takes them to the next window where users can specify the file they want to import, and contains the option to browse the file
Once the file is selected, clicking on the Next button takes the user to the next step, where users can input a Password for the Private Key and access and adjust the other Import options
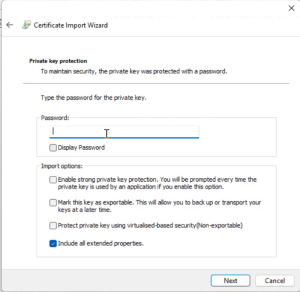
Once done, the signature file is then installed in bConnect and is ready for use.
Attaching a Digital Signature
In order to attach a digital signature to any file, document, or invoices users must select one for the rules if already created and click on the “Edit” button. In this case, the “Sales Invoice” Rule has been selected
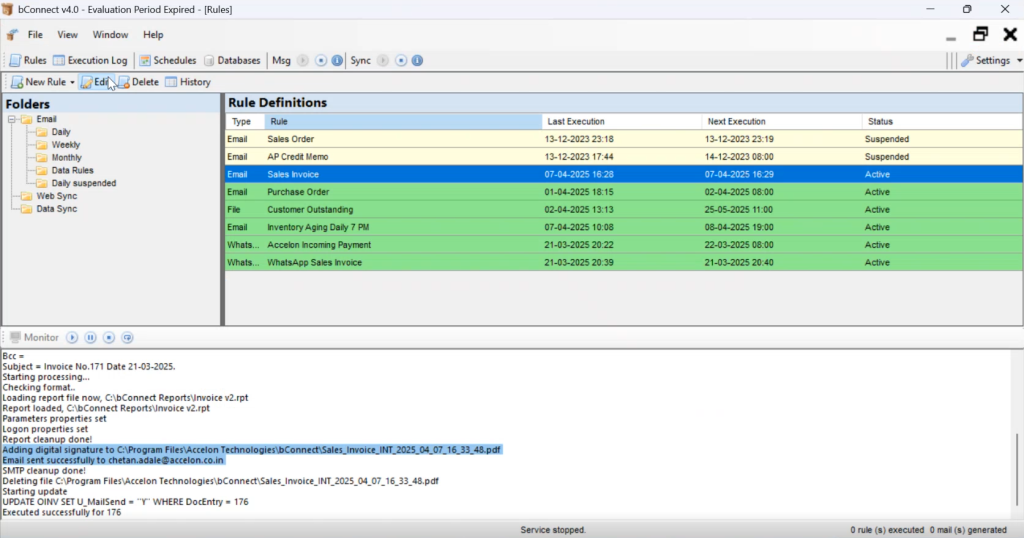
Once done, the “Rule” window for the selected rule will pop up
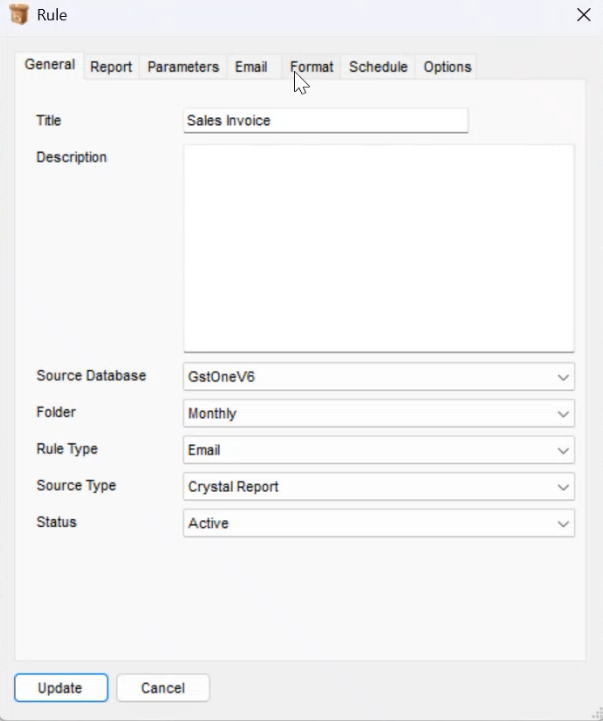
It has various Tabs for defining different rules pertaining to it. Users can see the General, Reports, Parameters, Email, Format, Schedule and Options tab for defining the various criteria.
For Digital Signature specifically, users need to click on the “Format” tab to access the option. Once clicked, it will look something like this
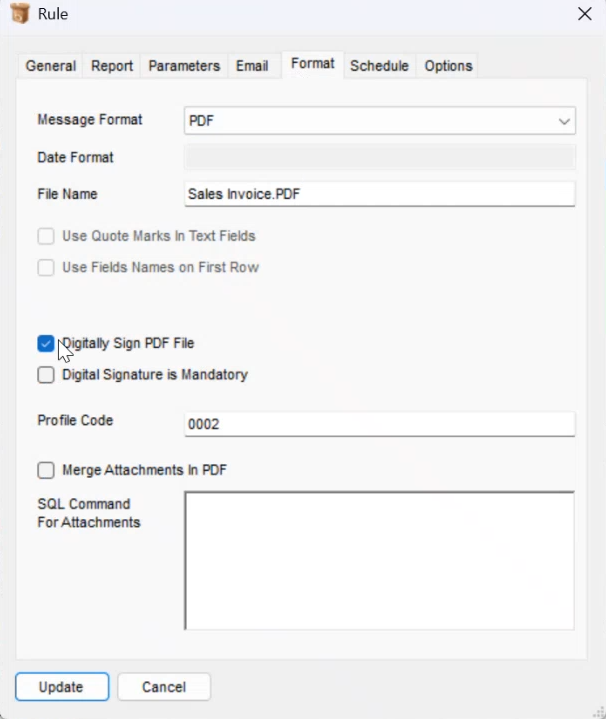
As visible in the screenshot, the Format tab contains fields check boxes for Message Format, Date Format, File Name, Use Quote Marks in Text Fields, User Fields Names in First Row, Digitally Sign the PDF, Digital Signature is Mandatory, Profile Code, Merge Attachments in PDF, and SQL Command For Attachments.
First, users have to enable the Digitally Sign the PDF option as visible in the screenshot
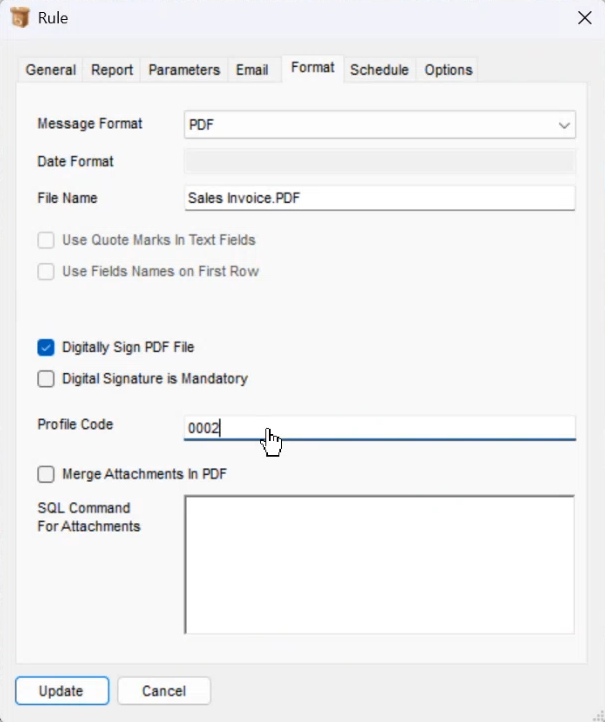
Next for Profile Code, users have to add the data manually in the BcData of the SQL Server, in this case, BcDataOld (database name)
To do so, the user first has to click on the New Query option after selecting the SQL database. This opens up a new pane on the right where users can add the required queries
In the following example, a query for the same has already been made. For doing so, we will access the dbo.SignProfile table
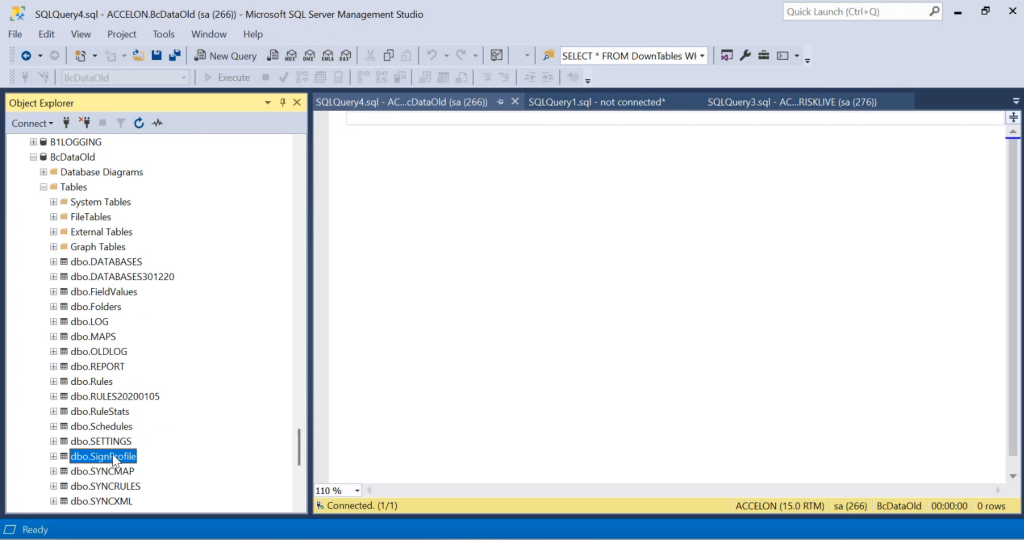
Once dbo.SignProfile table is selected, the user right-clicks on it, which opens a host of options for it. From the available options, the user selects the “Edit Top 200 Rows” option. This opens the rows and columns to be edited on the right side of the screen. Also, users already need the ready Digital Signature file before editing or creating this query. In this case, the user already has one, which is visible in the “PfxFile” field. The path of the digital signature file will go in the PfxFile field.
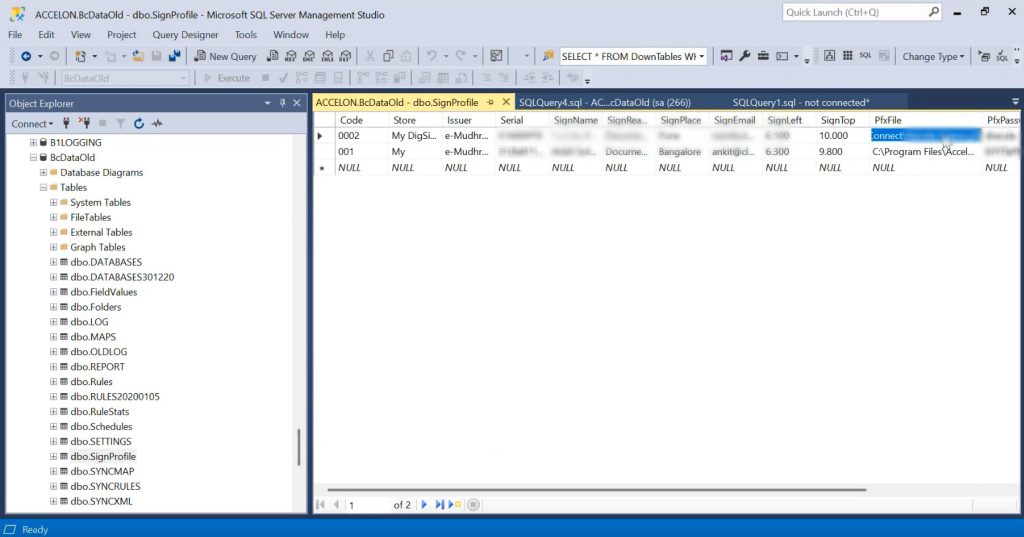
It also has columns for important details such as the Code, Store, Issuer, Serial, SignName, SignReason, SignPlace, SignEmail, SignLeft, SignTop, PfxFile,PfxPassword, SignAllPage, SignFirstPage, and SignLastPage to input other important digital signature details.
Once all the entries are done in it, users can come back to bConnect, enter the Profile Code used for the selected PfxFile, and click on the Update button
Users can also see the status of it all in the Monitor window below the Folder and Rule Definitions table and columns
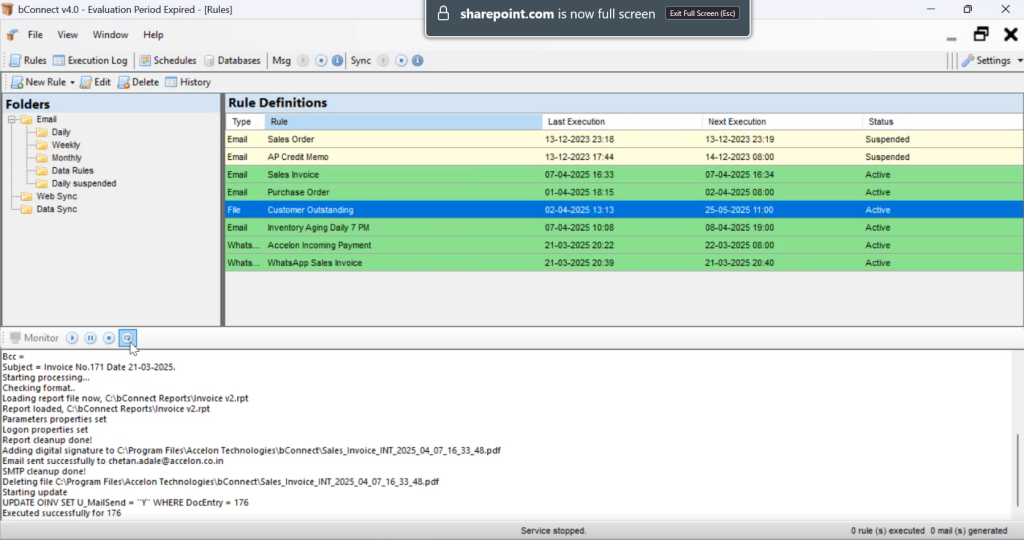
As soon as the user updates the rule, the Digital Signature is added to the report.
Sending the Digitally Signed Invoice
Once the digital signature has been attached to the invoice, the user can then proceed to send it to the concerned parties.
To start, the user first has to select the rule created for the invoice and click on edit to open the Rule window. Then, they have to click on the Source Type dropdown option of the General tab in the rule window and select the source.
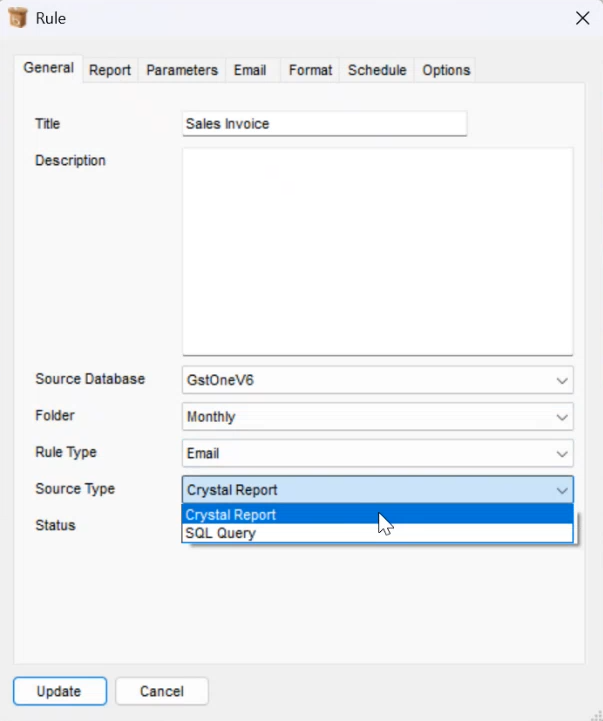
Next, they have to move on to the Report tab and in the Crystal Report File option, select the path where the digitally signed invoice is located and also enable the Set Datasource on Location in Crystal Reports option

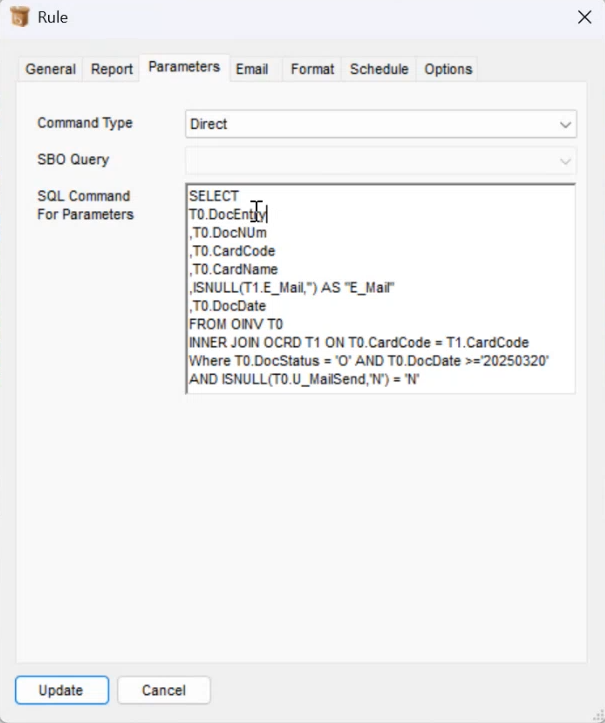
Next, moving to the Parameters tab, users can review or add SQL commands or parameters and conditions according to the report in the SQL Command for Parameters option
After that, users have to move on to the Email tab, where they can input all the details related to the email from Email To, to Display Name as visible in the image
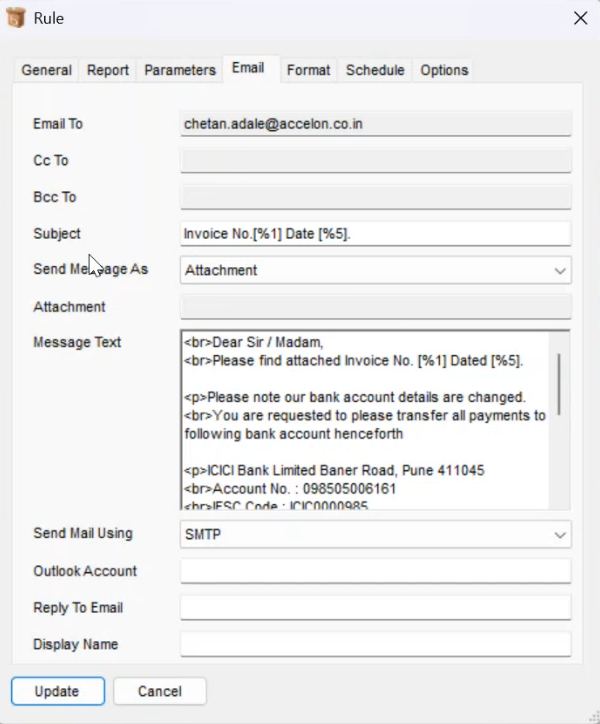
One important thing in this is to select the Attachment option in the Send Message As option

Next, in the Format tab, users have to select the Format for the report from a list of given options in the Message Format dropdown option
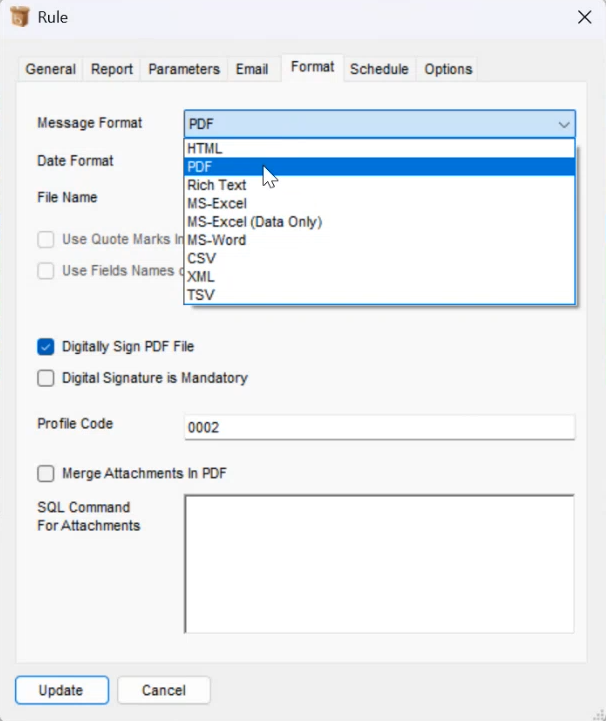
Also, they have to add the file name in the File Name option, which in this instance is Sales Invoice.PDF
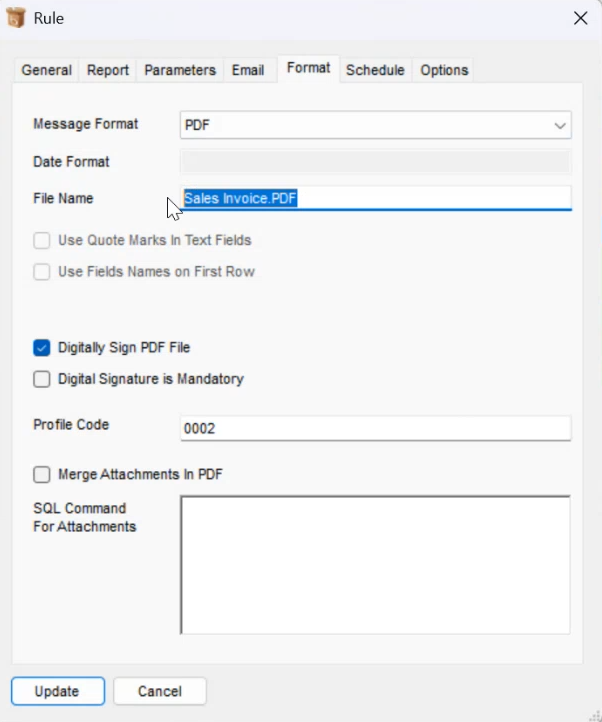
Once done, users have to click on the Update button in the bottom left to update the rule
Next, users have to select the updated rule and right-click on it. In this instance, right-clicking on the Sales Invoice rule brings up a host of options. Users then simply have to click on the Execute Now option from the list of options

This pops up the bConnect prompt reading – Execute rule Sales Invoice, to which the user has to click on the Yes option. Once done, the mail with the Digitally Signed invoice is sent to the concerned parties, and the status of it is visible in the Monitor window below the Folders and Rule Definitions rows and columns
Conclusion
Digitally signing and sending invoices through bConnect not only enhances document security and authenticity but also streamlines business workflows by reducing manual intervention. From certificate installation to profile configuration, signature placement, and email automation, bConnect offers a comprehensive and user-friendly platform for secure document handling.
By following the steps outlined in this blog, users can confidently set up digital signature processes that are both compliant and efficient. Whether you’re managing high volumes of invoices or ensuring compliance in regulated industries, bConnect ensures your documents are protected, professional, and promptly delivered.
Ready to simplify and secure your document workflows? Reach out to us or learn more about how bConnect can revolutionize your document management workflows.


